Communication
Here we will highlight a few methods for communication with Javascript
See also WLJS Functions
Direct call
Let us define our dummy function
.js
core.MyFunction = async (args, env) => {
  const data = await interpretate(args[0], env);
  alert(data);
}
then the fastest and most direct way of calling it is using FrontSubmit
FrontSubmit[MyFunction["Hello World!"]]
or chaining it with some other WLJS function
FrontSubmit[MyFunction[ReadClipboard[]]]
Execution in a cell
So-called FrontEndExecutable gives a DOM element our function because of their StandardForm is defined like that. This is the easiest way
.js

core.MyFunction2 = async (args, env) => {
  const data = await interpretate(args[0], env);
  env.element.innerHTML = `<span style="color:red">${data}</span>`;
}
Now we can call it from our cell
CreateFrontEndObject[MyFunction2["Hello World!"]]
it behaves like a symbol.
You don't have to always use CreateFrontEndObject. It is possible to force Wolfram Kernel to apply it automatically on output using MakeBoxes or use ViewBox directly i.e.
MyFunction2 /: MakeBoxes[m_MyFunction2, StandardForm] := (
	ViewBox[m, m]
)
This is basically how Graphics and others are implemented.
Data fetching
A back communication is also possible
.js

core.MyFunction3 = async (args, env) => {
  return [1,2,3,4,5,6];
}
and to read it synchronously
FrontFetch[MyFunction3[]]
or asynchronously
Then[FrontFetchAsync[MyFunction3[]], Function[data, Print[data]]]
Server IO
We can call any WL function using Events system
API
Standard way with payload
We use this pattern 90% of the time for many UI blocks
.js

const button = document.createElement('button');
button.innerText = "Press me";

button.addEventListener('click', () => {
  server.kernel.io.fire('eventUid', true);
});

return button;
Now we can capture it using
EventHandler["eventUid", Print]
Or for a specific pattern
.js

const button = document.createElement('button');
button.innerText = "Press me";

button.addEventListener('click', () => {
  server.kernel.io.fire('eventUid', true, 'pattern 1');
});

return button;
EventHandler["eventUid", {"pattern 1" -> Print}]
Fastest way no payload
If you need just to fire an event without a payload, there is a special way
.js

const button = document.createElement('button');
button.innerText = "Press me";

button.addEventListener('click', () => {
  server.kernel.io.poke('eventUid');
});

return button;
EventHandler["eventUid", Print]
Fetch a symbol
Firstly define a symbol
GetTime := TextString[Now];
now we fetch it and display
.js

const dom = document.createElement('span');

server.kernel.io.fetch('GetTime').then(async (res) => {
  dom.innerHTML = await interpretate(res, {});
})

return dom;
Return Promise object to defer io fetch request, i.e.
GetTime := With[{p = Promise[]},
	(* do something or set a scheldule, call external *)
	p
]
Fire event and fetch the result
WLJS event system provides extra features to mimic full-duplex architecture. If one fires and event, it is possible to read the results of all subscribed listeners (if provided) or their handler functions
EventHandler[ev, Function[dataA,
	(* do something *)
	Return[dataB] (* <--- here *)
]]

EventHandler[ev // EventClone, Function[dataA,
	(* do something *)
	Return[dataC] (* <--- here *)
]]


EventFire[ev, ...] (* ---> {dataB, dataC} *)
Here is an example with Javascript
.js

const button = document.createElement('button');
button.innerText = "Press me";
button.style.background = "pink";
button.style.padding = "1rem";

button.addEventListener('click', async () => {
  const data = await server.kernel.io.request('eventUid', true);
  button.innerHTML = await interpretate(data, {});
});

return button;
EventHandler["eventUid", Function[Null,
  RandomWord[]
]]
Return Promise if you need to do some deferred calculations.
Custom UI component
Using JS one can craft its own UI components. For example
.js

core.MyCustomComponent = async (args, env) => {
  const label = await interpretate(args[0], env);
  const ev = await interpretate(args[1], env);

  const button = document.createElement('button');
  button.innerText = label;
  button.style.backgroundColor = "lightblue";

  button.addEventListener('click', () => {
    server.kernel.io.fire(ev, true);
  });

  env.element.appendChild(button);
}
Now we can make boxes for it
MyCustomComponent /: MakeBoxes[m_MyCustomComponent, StandardForm] := With[{},
  ViewBox[m, m]
]
In action
MyCustomComponent["Click me pls", "event1"]
EventHandler["event1", Print];
Integrating with standard inputs
It is much easier to work with EventObject
ClearAll[MyCustomComponent]

MyCustomInput[label_String] := With[{uid = CreateUUID[]},
  EventObject[<|"Id"->uid, "View"->MyCustomComponent[label, uid]|>]
]
in action it behaves similar to InputRange and etc
EventHandler[MyCustomInput["Click me"], Print]
Using WLX
It is much easier to write markup in WLX compared to JS
.wlx

MyCustomComponent2[OptionsPattern[]] := With[{
  Event = OptionValue["Event"],
  Label = OptionValue["Label"],
  Uid = CreateUUID[]
},
  <div>
    <button id="{Uid}" style="background: lightblue" class="p-1">
      <Label/>
    </button>
    <script type="module">
      document.getElementById('<Uid/>').addEventListener('click', () => {

          server.kernel.io.fire('<Event/>', true);
      })
    </script>
  </div>
]

Options[MyCustomComponent2] = {"Event" -> "", "Label" -> "Click me"};
In action
MyCustomComponent2["Event"->"test", "Label"->"Hello World!"] // WLXEmbed
EventHandler["test", Print];
or combining with a previous technic
MyCustomInput2[label_String] := With[{uid = CreateUUID[]},
  EventObject[<|"Id"->uid, "View"-> HTMLView[MyCustomComponent2["Label"->label, "Event"->uid]]|>]
]
You can use it as a normal input element
EventHandler[MyCustomInput2["Click me"], Print]
Side effects
To call another function after an elements was drawn see HTMLView page. See below
Using WLX + 2 ways binding
It is also possible to combine your custom input element with traditional Dynamics. For instance you want to create multiple input fields, which are synchronised with each other. Therefore you need a WLJS Functions with update methods defined. One can generate those on-fly for each input element within a WLX script
.wlx

CustomInput[sym_, OptionsPattern[]] := Module[{
  Label = OptionValue["Label"],
  Ev = OptionValue["Event"],
  Pattern = OptionValue["Pattern"],
  Handler
},

  With[{Template =
    <div class="mt-2 flex">
      <div style="width: 7rem" class="flex shrink-0 items-center rounded-l-md bg-white px-3 text-base text-gray-500 outline outline-1 -outline-offset-1 outline-gray-300 sm:text-sm/6"><Label/></div>
      <input type="number" step="1" class="-ml-px block w-full grow rounded-r-md bg-white px-3 py-1.5 text-base text-gray-900 outline outline-1 -outline-offset-1 outline-gray-300 placeholder:text-gray-400 focus:outline focus:outline-2 focus:-outline-offset-2 focus:outline-indigo-600 sm:text-sm/6" placeholder="0.0"/>
    <script type="module">
      core['<Handler/>'] = async (args, env) => {
        const input = env.element.getElementsByTagName('input')[0];


        const data = await interpretate(args[0], env);
        input.value = +data.toFixed(4);
        env.local.input = input;

        input.addEventListener('change', () => {

          console.warn(input.value);
          env.local.skip = true;
          server.kernel.io.fire('<Ev/>', Number(input.value), '<Pattern/>');
        });
      }

      core['<Handler/>'].update = async (args, env) => {
        if (env.local.skip) {
          env.local.skip = false;
          return;
        }

        console.log('Update');
        env.local.input.value = +(await interpretate(args[0], env)).toFixed(4);
      }

      core['<Handler/>'].destroy = () => {
        delete core['<Handler/>'];
      }

      core['<Handler/>'].virtual = true;
    </script>
  </div>
  },
    HTMLView[Template, Epilog->(Handler[sym])]
  ]
]

Options[CustomInput] = {"Label"->"", "Event"->"", "Pattern"->"Default"};
what happens here:
- we define a template for our custom input field
- we define a support script with a generated
Handlerfunction, which reads and updates this input field - we pack in into HTMLView, which calls our
Handleron a provided argument after this component has been mounted
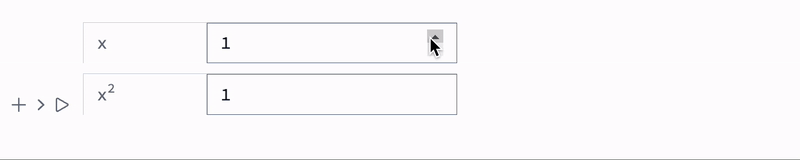
Let's see it in action
Emit event from WLJS
One can fire an event also using frontend's function EventFire, which is effectively acts like server.kernel.io.fire being called from the WLJS Interpreter (i.e. using FrontSubmit or other and wrapped in Offload)
Not implemented! PR
EventHandler["internalEvent", Print];
FrontSubmit[EventFire["internalEvent", ReadClipboard[]] // Offload]
It will send an expression to be executed on the frontend, that reads a clipboard and fires back an event with a fetched data.